Wazuh custom webhook integrations
Wazuh custom webhook integrations with docker
Apr 3, 2025
บันทึกการ custom webhook ใน Wazuh สำหรับกรณีเรา deployment wazuh ด้วย docker นะครับ สิ่งต้องเตรียม script python และ Notification Services การ notify เราจะมาใช้บริการของ ฺBMS Notification Services เป็น App สำหรับการแจ้งเตือนอย่างเดียวนะครับและการเข้าใช้งาน ก็ต้องเป็นเจ้าหน้าที่สาธารณสุขเท่านั้นด้วยนะครับ เพราะใช้ ProviderID ในการ login นะครับ
1.การเตรียม Token
เข้าไปโหลด App และ Copy Token ได้จาก คลิก link นี้เลย
2. Script Python
copy script ด้านล่างนี้ไปสร้างไฟล์ชื่อ custom-webhook.py ต้องเป็นชื่อนี้เท่านั้นนะครับ
#!/usr/bin/env python3
import sys
import json
import urllib.request
import urllib.error
import ssl
import logging
from datetime import datetime, timedelta

#/var/ossec/integrations/custom-webhook.py
# ossec.conf configuration structure
"""
<integration>
   <name>custom-webhook.py</name>
   <api_key>Token</api_key>
   <hook_url>https://api.notify.bmscloud.in.th/api/v1/push-notify</hook_url>
   <level>10</level>
   <group>syscheck,authentication_success,authentication_failed,multiple_drops,authentication_failures</group>
   <alert_format>json</alert_format>
</integration>
"""

# อ่านพารามิเตอร์จาก Wazuh (ไฟล์ Alert)
alert_file = sys.argv[1]
api_key = sys.argv[2]
hook_url = sys.argv[3]
debug_enabled = True
LOG_FILE = f'/var/ossec/logs/integrations.log'

def debug(msg: str) -> None:
    if debug_enabled:
        print(msg)
        with open(LOG_FILE, 'a') as f:
            f.write(msg + '\n')

# อ่านข้อมูล Alert จากไฟล์
with open(alert_file, 'r') as f:
    alert_json = json.load(f)

# เตรียม Payload โดยให้ content เป็น String
original_time = alert_json.get('timestamp', 'N/A')
dt = datetime.strptime(original_time, "%Y-%m-%dT%H:%M:%S.%f%z")
dt_thai = dt + timedelta(hours=7)
formatted_time = dt_thai.strftime("%d/%m/%Y %H:%M:%S")
workstation = alert_json.get('data', {}).get('win', {}).get('eventdata', {})
alert_data = (
    f"**alertId**: {alert_json.get('id', 'N/A')}, "
    f"**agentName**: {alert_json.get('agent', {}).get('name', 'N/A')}, "
    f"**ruleDescription**: {alert_json.get('rule', {}).get('description', 'N/A')}, "
    f"**workstationName**: {workstation.get('targetUserName', 'N/A')}[{workstation.get('ipAddress', 'N/A')}], "
    f"**level**: {alert_json.get('rule', {}).get('level', 'N/A')}, "
    f"**timestamp**: {formatted_time} "
)

payload = { "content": alert_data }

# Headers สำหรับการเรียก API
headers = {
    "Token": api_key,
    "Content-Type": "application/json"
}

# ส่งข้อมูลไปยัง API
try:
        data = json.dumps(payload).encode('utf-8')
        req = urllib.request.Request(hook_url, data=data, headers=headers, method="POST")
        # ข้าม SSL verification
        context = ssl.create_default_context()
        context.check_hostname = False
        context.verify_mode = ssl.CERT_NONE
        # ส่ง request
        with urllib.request.urlopen(req, context=context, timeout=10) as response:
                if response.status in (200, 201):
                        debug(f"Successfully sent alert to webhook")
                        sys.exit(0)
                else:
                        debug(f"Failed to send alert to webhook. Status code: {response.status}")
                        sys.exit(1)
except Exception as e:
    debug(f"Error sending alert: {str(e)}")
    sys.exit(1)
3.แก้ไขไฟล์ docker-compose.yml
ssh เข้า server แก้ config กรณีนี้ใช้ single-node นะครับ multi-node ก็ใช้ได้คล้ายๆกันครับ ไปเพิ่มอีกหนิ่งบรรทัดที่ service ของ wazuh.manager ตรง volumes นะครับ
volumes:
    - ./config/integrations/custom-webhook.py:/var/ossec/integrations/custom-webhook.py
จากตัวอย่างนี้เราได้สร้างโฟลเดอร์ชื่อ integrations แล้ว เอา script มา save ไว้ในนี้นะครับ หลังจากเพิ่มเสร็จแล้วก็ Restart docker หนึ่งทีและจัดการสิทธิ์ให้พร้อมใช้งาน
#Restart docker
docker compose up -d --force-recreate wazuh.manager

# เข้าไปใน container
docker compose exec -it wazuh.manager bash

# ให้สิทธิ์การใช้งาน
chmod 750 /var/ossec/integrations/custom-webhook.py
chown root:wazuh /var/ossec/integrations/custom-webhook.py
exit
4.เข้าไปเพิ่ม config ossec.conf
ใน docker จะใช้แก้ไขที่ config/wazuh_cluster/wazuh_manager.conf
เอาไปต่อจาก alerts
เอา Token ที่เตรียมไว้เปลี่ยนแทน
<alerts>
....
</alerts>

<integration>
   <name>custom-webhook.py</name>
   <api_key><Token></api_key>
   <hook_url>https://api.notify.bmscloud.in.th/api/v1/push-notify</hook_url>
   <level>10</level>
   <group>syscheck,authentication_success,authentication_failed,multiple_drops,authentication_failures</group>
   <alert_format>json</alert_format>
</integration>
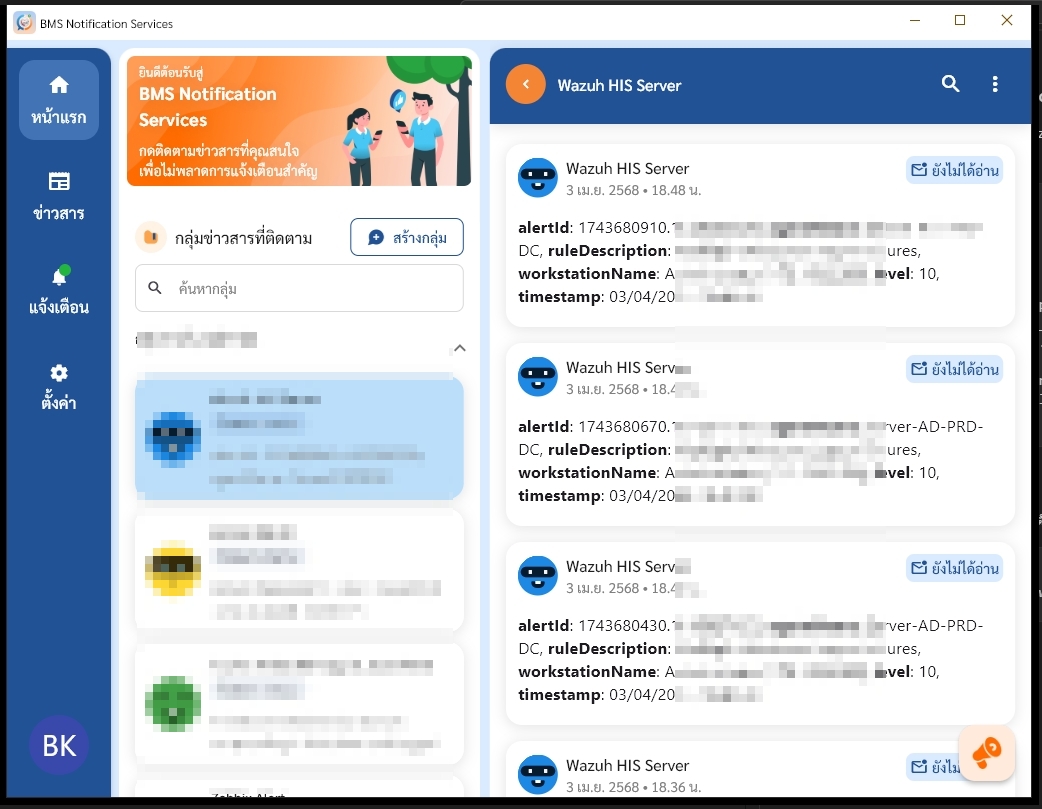
5.Test and monitor
ลองปรับ level ให้ต่ำๆ เช่น 3/5 แล้วตัด group ออกเพื่อ test ว่า custom-webhook ทำงานไหม ถ้าขึ้น Successfully sent alert to webhook เป็นอันสำเร็จ
#monitor log
docker compose exec -it wazuh.manager tail -f /var/ossec/logs/integrations.log